This is a new topic in 12.03.
This is a new topic in 12.04.
Content highlighted in yellow is new in 12.03.
Content highlighted in blue is new in 12.04.
Individual Time Entry
Individual Time Entry is where you can create, edit and delete non-real-time transactions for yourself and others, given you have the correct permissions. To manage individual time for someone else, you must be listed as their director, manager or supervisor or the person they “work to” in ERP+ and the management settings in System Configuration must allow you access to create/edit/delete timesheet data.
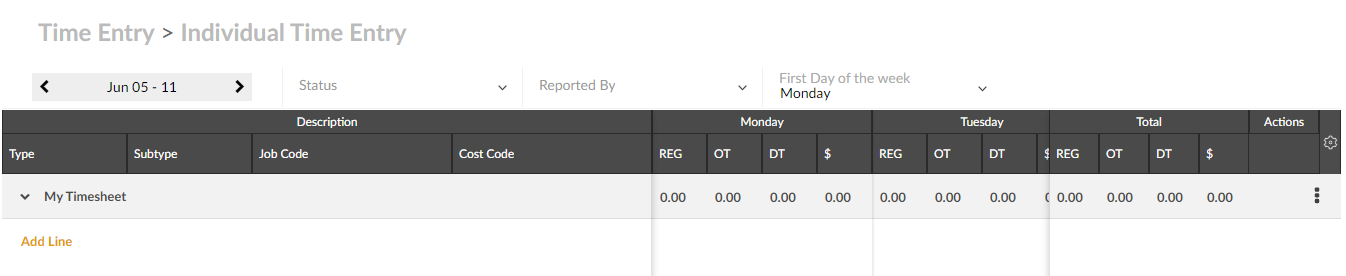
Creating a line
-
First select which week you would like to record time for. The currently selected week is shown above the grid; this will be the present week by default. You can use the < and > buttons to move backwards and forwards between weeks or click the date range to open the calendar and select a week from there.
-
Click Add Line under the timesheet of the person you are recording it for. A new line will appear in the timesheet.
-
Complete the Description details of the new line using in-line editing. The time type, job code and cost code are mandatory fields.
-
Enter the regular hours, overtime hours, double time hours and payment amount (if applicable) for each day. You will likely have to use the scroll bar at the bottom of this section of the grid to be able to see every day of the week. All changes are automatically saved when you click away from the field. The numbers in the Total section are updated automatically as you fill in each day and cannot be edited.
Editing a line
In-line editing is enabled for every line of every timesheet which has not yet been completed. If the timesheet has been completed, you must recall it before you can edit it (see Completing and recalling a timesheet below). If the line was recorded for a timesheet period which is no longer open to reporting, you will not be able to recall the timesheet.
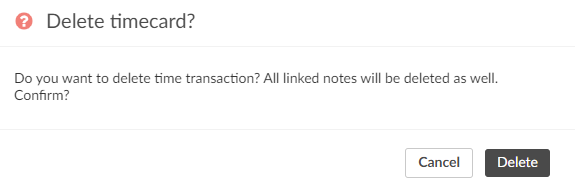
Deleting a line
A line can be deleted from a timesheet at any time up until the timesheet is completed. If the timesheet has been completed, you must recall it before you can delete any lines from it (see Completing and recalling a timesheet below). If the line was recorded for a timesheet period which is no longer open to reporting, you will not be able to recall the timesheet.
-
To delete a line, click the Delete button
 in the Actions column. You will receive a popup asking if you are sure.
-
Click
 to confirm.
Completing and recalling a timesheet
Once you have recorded all the time clocked within the selected week for yourself or someone else, you must complete the timesheet to submit it for job approval. If you complete the timesheet before the deadline, you will still be able to recall the timesheet up until the timesheet period is closed for reporting to make changes to it if necessary.
To complete a timesheet, click the three dots button on the same row as the employee’s name, or the row which says “My Timesheet” if it is your own timesheet, then click Complete Timesheet.
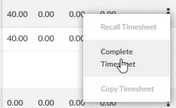
Similarly, to recall a timesheet, click the three dots button then click Recall Timesheet. If the timesheet period is closed for reporting, the Recall Timesheet option will be greyed out.